| This manual is deprecated. Please visit https://groupoffice.readthedocs.io for the latest documentation. |
Difference between revisions of "E-mail"
(→Auto data tags) |
(→Creating an e-mail signature / template) |
||
| Line 63: | Line 63: | ||
You can create multiple signatures with e-mail templates. To edit them, goto: | You can create multiple signatures with e-mail templates. To edit them, goto: | ||
| − | + | Address book -> Administration -> Templates. | |
| − | + | Double click on a template or create a new one to edit it. To add new templates you need to have manage permissions for the E-mail templates and address lists module. | |
| + | |||
| + | If you drafted an HTML document in another program, make sure this HTML only contains inline style. Style sections in the head are not supported. You may need to use a tool to convert the head style to inline style such as this: http://inlinestyler.torchboxapps.com/ | ||
<b>Important!</b> When you insert an image make sure you don't copy paste it from another template or web page. Always insert it through the insert image toolbar from the template editor. This way the image will be embedded into the HTML e-mail template and will automatically be sent along with your e-mail messages. | <b>Important!</b> When you insert an image make sure you don't copy paste it from another template or web page. Always insert it through the insert image toolbar from the template editor. This way the image will be embedded into the HTML e-mail template and will automatically be sent along with your e-mail messages. | ||
Revision as of 09:03, 2 December 2013
Contents
Setting up accounts
Only users with manage permissions for the e-mail module can create e-mail accounts. If you don't have manage permissions then you can only edit your e-mail address, sender name and signature if you have one preconfigured.
Go to:
E-mail -> Administration -> Accounts
to view your accounts. You can doubleclick one to edit it.
To setup a new account you need some information from your e-mail service provider. You need the following values:
- Your e-mail address
- The hostname of the incoming mail server. It has to be an IMAP server. POP-3 is not supported as of version 3.5.
- The service port
- Your username and password
- In case of an IMAP server you need to know what the root mailbox is. In case you don't know this value leave it empty. If you are having troubles with creating folders then you can try to enter 'INBOX' or 'mail' here.
- Outgoing SMTP server and port
With this information you can create an account easily. Go to:
E-mail -> Administration -> Accounts -> Add
After that fill in the e-mail address and name that should be associated with this account. If you are an administrator you can also set it up for another user by selecting it here. At last fill in the other values you got from your e-mail service provider. If you get a 'certificate-failure' error then tick the 'Don't validate certificate' option.
Sender aliases
At the account properties screen:
E-mail -> Administration -> Accounts -> Double click account
You'll find a button called "Sender aliases". At this dialog you can define multiple sender aliases. For example you might want to have a your.name@domain.com and webmaster@domain.com alias. Make sure the alias is defined on the mailserver side too.
Configuring special folders like drafts, sent items and trash
If you want to change the folder where you save drafts, sent items or trash or when you have problems with one of those, you can manually configure them. Go to:
E-mail -> Administration -> Accounts -> Double click account row -> Folders
Here you can select the correct folder for each task.
Subscribing to IMAP folders
Right click on any folder and select "Subscribe to folders" to manage IMAP folder subscribtions.
Automatic e-mail checking
Group-Office checks for new mail every two minutes. When new mail is found the screen automatically refreshes and if you're not in the mail module, an e-mail icon with the amount of new messages will be displayed in the top right notification area. By default, Group-Office only checks the inbox folder for new mail. If you want to check additional folders, right click on the folder and select "Properties". Check "Automatically check this folder for new messages". This only makes sense if you configured filters to deliver mail to other folders.
Sharing e-mail accounts
If you want to edit the e-mail account permissions to share an account you must go to:
E-mail -> Administration -> Accounts -> Double click account -> Permissions
Here you can add the users and user groups you want to grant access. Read more about managing permissions here.
Secretary
If you want a secretary who handles calendar invitations, you may need to share the e-mail accounts too. It's important that you share the owner's e-mail account instead of adding a duplicate mail account. Group-Office uses the e-mail account owner to find the right calendar to store the appointments in.
Creating an e-mail signature / template
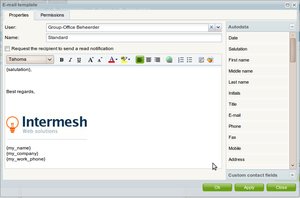
You can create multiple signatures with e-mail templates. To edit them, goto:
Address book -> Administration -> Templates.
Double click on a template or create a new one to edit it. To add new templates you need to have manage permissions for the E-mail templates and address lists module.
If you drafted an HTML document in another program, make sure this HTML only contains inline style. Style sections in the head are not supported. You may need to use a tool to convert the head style to inline style such as this: http://inlinestyler.torchboxapps.com/
Important! When you insert an image make sure you don't copy paste it from another template or web page. Always insert it through the insert image toolbar from the template editor. This way the image will be embedded into the HTML e-mail template and will automatically be sent along with your e-mail messages.
You can also share the template so other users can use it too.
Important! You can't use this feature together with the plain text signature at
E-mail -> Administration -> Accounts -> Double click account row.
Either use the simple plain text signature here or the e-mail templates.
Changing the font
You can't select a font in the template editor. The font is globally defined in config.php. The administrator can change the default font:
$config['$html_editor_font']="font-size:13px; font-family:Arial, Helvetica, sans-serif;";
Auto data tags
It's possible to use automatic data fields with templates. You can use {user:*} and {usercompany:*} tags for the logged in user. You can use {contact:*} tags for the recipient. A full list of tags can be looked up here:
Addressbook#Document_templates
It's not possible to use other tags like {project:*} etc. in e-mail templates.
Configuring auto replies and forwarding
To configure automatic replies or forwarding you must use e-mail filters. Read more about them below.
Sorting accounts
If you would like to sort the order of multiple accounts in the treeview, you can simply drag them around in the treeview.
Filter e-mails
With sieve support
To use advanced filter e-mails, your IMAP server must support ManageSieve and the Sieve e-mail filtering module must be installed and enabled for your account. Also check if the correct sieve port is set at the incoming mail advanced settings. The port is usually 4190 or 2000.
To edit or add e-mail filters go to:
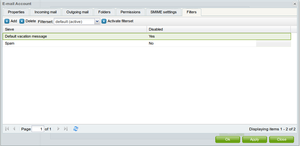
E-mail -> administration -> Accounts -> Double click account row -> Filters
By default there are already 2 simple filters available:
- A standard vacation filter
- This filter is disabled by default
- It will be applied to every incoming mail
- You can set the number of days before a new message (Your vacation message) will be send to the sender for the second time.
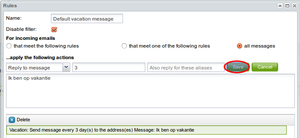
- By default, only the primary address which is your username will work. You can set aliases of your mail account in the "Also reply for these aliases" so they will be triggered too.
- You can set your own vacation message in the large text area.
- A standard spam filter
- This filter is enabled by default
- It will look for the "Spam" header in the email
- It will place the spam message in the spam folder of your mail account
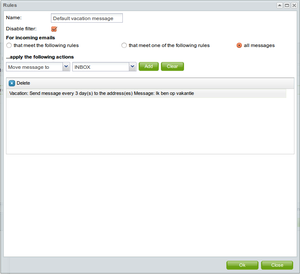
Edit a filter
Double click on a filter set (A new window opens)
In this window you can add criteria and desired actions for the filter.
Without sieve support
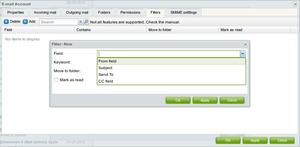
When sieve is not supported. Group-Office will fallback on a simpler filtering system. It can only move incoming e-mails to specified folders based on the from, to or subject text.
Set Group-Office as your default e-mail client
When you click on an e-mail address in a program or web browser your e-mail client will launch to compose a new message. You can configure your system to launch Group-Office to compose e-mail messages when you click on an e-mail address.
Microsoft Windows
- Click on Settings on the top right
- Click on the E-mail tab
- Click on "this register file"
- From the download dialog choose "Run"
- Confirm that you want to run it.
- Windows should report now that the data was successfully entered into the register and Group-Office will be used as the default mail program.
Linux (Gnome)
- Select "System"->"Preferences"-> "Standard applications" from the menu bar
- At e-mail program select "Custom program"
- Enter the command below
firefox http://<your URL to Group-Office>/?r=email/message/mailto&mailto=%s
Ubuntu (Unity)
Create a file called /usr/share/applications/groupoffice.desktop and enter the following:
[Desktop Entry]
Icon=mail-message-new
MimeType=x-scheme-handler/mailto;
Name=Group-Office
Comment=Group-Office
Exec=xdg-open http://<your URL to Group-Office>/?r=email/message/mailto&mailto=%u
Type=Application
X-XFCE-MimeType=x-scheme-handler/mailto;
Save it and then click the power button on the top right and click "System settings". Click on "Details" and set Group-Office as the default mail application.
Saving or linking e-mail in Group-Office
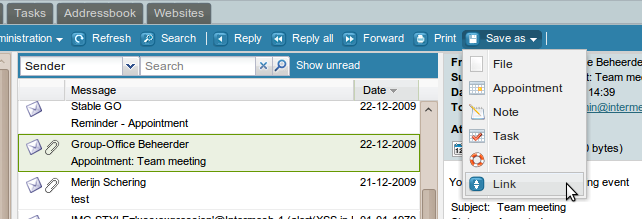
It's possible to save e-mail at a contact, project, company, task etc. To do this simply select an e-mail and click the "Save as" button. You can save it as:
- Link to any linkable object.
Read more about links here - File
in the file manager - Task
the e-mail subject and body will be the task name and description and the attachments are stored as files. - Event
the e-mail subject and body will be the event name and description and the attachments are stored as files. - Note
the e-mail subject and body will be the note title and description and the attachments are stored as files. - Ticket
the e-mail subject and body will be the ticket subject and description and the attachments are stored as files.
Archiving e-mail
Having all your mail online on an IMAP server is great. But after a couple of years it's probably a good idea to archive some e-mail on your local computer to save some space online. We recommend that you do this with Thunderbird. Using the searches is probably the most straightforward solution and works on any system. You can read all about it here:
Archiving your e-mail using searches
SMIME
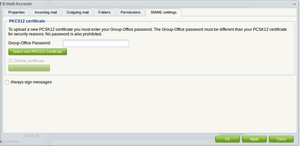
With SMIME you can sign and encrypt your messages. If the SMIME module has been installed you should have an SMIME tab at:
E-mail -> Settings -> Accounts -> Double click account.
Here you must upload a PCSK12 (*.p12) certificate. For security reasons, you must enter your Group-Office password here. Group-Office will verify that the Group-Office password does not match the PCSK12 password file. A PCSK12 file without a password will also not be accepted.
Obtaining a certificate for SMIME
A good article on how to get a certificate can be found here:
http://kb.mozillazine.org/Getting_an_SMIME_certificate
You can import the certificate into Firefox and create a *.p12 backup file at with the Firefox certificate manager. You can find that in the Advanced menu of the Firefox preferences tab. For security reasons, make sure you choose a password that is different from your Group-Office account.
Note: Somehow Group-Office is unable to verify the certificate if you generate the p12 backup file with Google Chrome. Please use Firefox to obtain your p12 file.
Signing and Encrypting messages
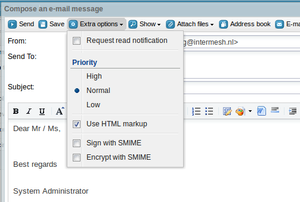
Once you've setup your certificate you can sign and encrypt messages in the e-mail composer using the "Extra options" menu (See screenshot). Note that you'll need the public certificates of all the recipients when encrypting a message. You can obtain public certificates by verifying their signatures when they send you a signed message.
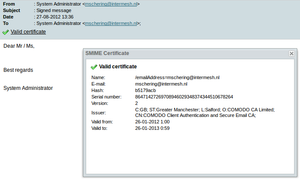
Verifying and saving public certificates
When you receive a signed message, you can verify the signature. When the signature is valid Group-Office will automatically save the public certificate which can be used to send encrypted messages.
Root Certificates
For correct verification you might need to set some extra certificates in the Group-Office config file. Click here for more info.
